PreFlop Camp — free GTO preflop poker trainer中文
Heads-Up Push/Fold Chart 8bb (Nash)
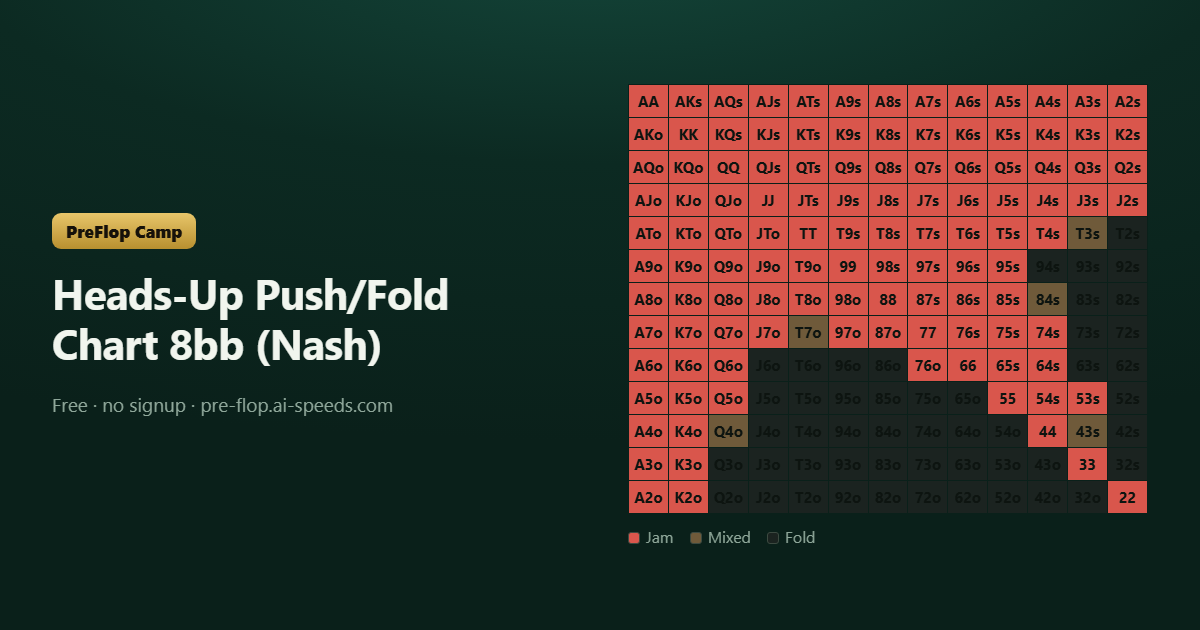
Heads-up at 8 big blinds: the Nash push/fold solution for both sides. The small blind jams 62% and the big blind calls 45% — both shown as full 13×13 charts with the expected value of every hand in big blinds, including the hands that are close to a coin flip.
Small blind — jamming range — 62.0%
| AA | AKs | AQs | AJs | ATs | A9s | A8s | A7s | A6s | A5s | A4s | A3s | A2s |
| AKo | KK | KQs | KJs | KTs | K9s | K8s | K7s | K6s | K5s | K4s | K3s | K2s |
| AQo | KQo | QJs | QTs | Q9s | Q8s | Q7s | Q6s | Q5s | Q4s | Q3s | Q2s | |
| AJo | KJo | QJo | JJ | JTs | J9s | J8s | J7s | J6s | J5s | J4s | J3s | J2s |
| ATo | KTo | QTo | JTo | TT | T9s | T8s | T7s | T6s | T5s | T4s | T3s | T2s |
| A9o | K9o | Q9o | J9o | T9o | 99 | 98s | 97s | 96s | 95s | 94s | 93s | 92s |
| A8o | K8o | Q8o | J8o | T8o | 98o | 88 | 87s | 86s | 85s | 84s | 83s | 82s |
| A7o | K7o | Q7o | J7o | T7o | 97o | 87o | 77 | 76s | 75s | 74s | 73s | 72s |
| A6o | K6o | Q6o | J6o | T6o | 96o | 86o | 76o | 66 | 65s | 64s | 63s | 62s |
| A5o | K5o | Q5o | J5o | T5o | 95o | 85o | 75o | 65o | 55 | 54s | 53s | 52s |
| A4o | K4o | Q4o | J4o | T4o | 94o | 84o | 74o | 64o | 54o | 44 | 43s | 42s |
| A3o | K3o | Q3o | J3o | T3o | 93o | 83o | 73o | 63o | 53o | 43o | 33 | 32s |
| A2o | K2o | Q2o | J2o | T2o | 92o | 82o | 72o | 62o | 52o | 42o | 32o | 22 |
JamMixedFold
Big blind — calling range — 45.0%
| AA | AKs | AQs | AJs | ATs | A9s | A8s | A7s | A6s | A5s | A4s | A3s | A2s |
| AKo | KK | KQs | KJs | KTs | K9s | K8s | K7s | K6s | K5s | K4s | K3s | K2s |
| AQo | KQo | QJs | QTs | Q9s | Q8s | Q7s | Q6s | Q5s | Q4s | Q3s | Q2s | |
| AJo | KJo | QJo | JJ | JTs | J9s | J8s | J7s | J6s | J5s | J4s | J3s | J2s |
| ATo | KTo | QTo | JTo | TT | T9s | T8s | T7s | T6s | T5s | T4s | T3s | T2s |
| A9o | K9o | Q9o | J9o | T9o | 99 | 98s | 97s | 96s | 95s | 94s | 93s | 92s |
| A8o | K8o | Q8o | J8o | T8o | 98o | 88 | 87s | 86s | 85s | 84s | 83s | 82s |
| A7o | K7o | Q7o | J7o | T7o | 97o | 87o | 77 | 76s | 75s | 74s | 73s | 72s |
| A6o | K6o | Q6o | J6o | T6o | 96o | 86o | 76o | 66 | 65s | 64s | 63s | 62s |
| A5o | K5o | Q5o | J5o | T5o | 95o | 85o | 75o | 65o | 55 | 54s | 53s | 52s |
| A4o | K4o | Q4o | J4o | T4o | 94o | 84o | 74o | 64o | 54o | 44 | 43s | 42s |
| A3o | K3o | Q3o | J3o | T3o | 93o | 83o | 73o | 63o | 53o | 43o | 33 | 32s |
| A2o | K2o | Q2o | J2o | T2o | 92o | 82o | 72o | 62o | 52o | 42o | 32o | 22 |
CallMixedFold
Expected value per hand (bb)
Highest EV: AA +3.4 KK +2.97 QQ +2.68 JJ +2.46 TT +2.26 AKs +2.22 AKo +2.11 AQs +2.05
Barely +EV (near-indifferent): T7o +0.01 J2s +0.02 J7o +0.02 76o +0.02 T4s +0.03 97o +0.03 T5s +0.05 74s +0.05
Looks playable, quietly loses: T3s -0.01 86o -0.02 63s -0.02 65o -0.03 94s -0.04 Q3o -0.05 T2s -0.06 93s -0.06
At eight blinds the small blind still jams 62% but the big blind's calling range has collapsed to 45%. That gap is where the small blind's profit comes from: every hand the big blind folds is 1.5bb won without a showdown.
The big blind tightening from 62% to 45% while the small blind barely moves (72% → 62%) is the single most important pattern in heads-up push/fold. The caller's price gets worse much faster than the shover's risk does, because the dead money in the middle stays fixed at 1.5bb no matter how deep the stacks are.
Practical consequence: against an opponent who calls 8bb shoves like it is 5bb, you should shove nearly everything and let them pay for it. Against one who calls correctly, the marginal hands at the bottom of the chart are close to indifferent and can be folded without cost.
Save or print this chart
FAQ
What is the correct heads-up shoving range at 8bb?
The small blind jams about 62% at 8bb; the full Nash range is on this page with the EV of every hand. Hands showing between +0.00 and +0.03bb are close to indifferent — shoving or folding them costs almost nothing in the long run.
Do these heads-up charts assume the big blind plays correctly?
Yes — both ranges are the equilibrium against each other (the big blind calls 45% here). If your opponent calls too wide, tighten your jams to value; if they fold too much, widen toward any two cards. The equilibrium is the baseline you deviate from, not a target to hit against a bad player.
Related charts
Heads-Up Push/Fold Chart 5bb (Nash)Heads-Up Push/Fold Chart 10bb (Nash)Heads-Up Push/Fold Chart 12bb (Nash)Heads-Up Push/Fold Chart 15bb (Nash)UTG Opening Range (6-Max)BB Defence vs Button Open (6-Max)
The trainer that draws these charts is a free download — core training is free, no signup, works offline.
Get it on Google PlayDownload on the App Store
Push/fold tables are a self-computed chip-EV Nash equilibrium (Monte-Carlo hand-class equity, 25,000 samples, seed 1234). Known limits, stated plainly: they ignore ICM, and the model does not apply card removal to the callers' range — so offsuit aces, which block a caller's AA/AK/AQ/AJ, are slightly undervalued. Exploitability for this stack: 0.005 bb/hand.
Updated 2026-09-12