PreFlop Camp — free GTO preflop poker trainer中文
Heads-Up Push/Fold Chart 25bb (Nash)
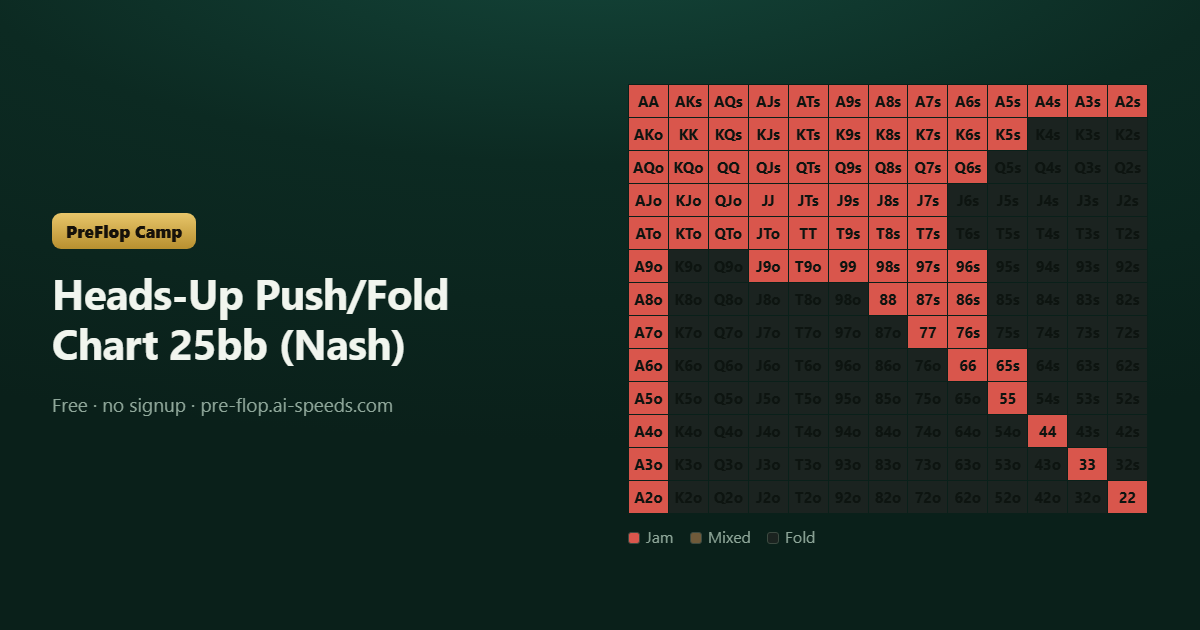
Heads-up at 25 big blinds: the Nash push/fold solution for both sides. The small blind jams 36% and the big blind calls 17% — both shown as full 13×13 charts with the expected value of every hand in big blinds, including the hands that are close to a coin flip.
Small blind — jamming range — 36.0%
| AA | AKs | AQs | AJs | ATs | A9s | A8s | A7s | A6s | A5s | A4s | A3s | A2s |
| AKo | KK | KQs | KJs | KTs | K9s | K8s | K7s | K6s | K5s | K4s | K3s | K2s |
| AQo | KQo | QJs | QTs | Q9s | Q8s | Q7s | Q6s | Q5s | Q4s | Q3s | Q2s | |
| AJo | KJo | QJo | JJ | JTs | J9s | J8s | J7s | J6s | J5s | J4s | J3s | J2s |
| ATo | KTo | QTo | JTo | TT | T9s | T8s | T7s | T6s | T5s | T4s | T3s | T2s |
| A9o | K9o | Q9o | J9o | T9o | 99 | 98s | 97s | 96s | 95s | 94s | 93s | 92s |
| A8o | K8o | Q8o | J8o | T8o | 98o | 88 | 87s | 86s | 85s | 84s | 83s | 82s |
| A7o | K7o | Q7o | J7o | T7o | 97o | 87o | 77 | 76s | 75s | 74s | 73s | 72s |
| A6o | K6o | Q6o | J6o | T6o | 96o | 86o | 76o | 66 | 65s | 64s | 63s | 62s |
| A5o | K5o | Q5o | J5o | T5o | 95o | 85o | 75o | 65o | 55 | 54s | 53s | 52s |
| A4o | K4o | Q4o | J4o | T4o | 94o | 84o | 74o | 64o | 54o | 44 | 43s | 42s |
| A3o | K3o | Q3o | J3o | T3o | 93o | 83o | 73o | 63o | 53o | 43o | 33 | 32s |
| A2o | K2o | Q2o | J2o | T2o | 92o | 82o | 72o | 62o | 52o | 42o | 32o | 22 |
JamMixedFold
Big blind — calling range — 17.3%
| AA | AKs | AQs | AJs | ATs | A9s | A8s | A7s | A6s | A5s | A4s | A3s | A2s |
| AKo | KK | KQs | KJs | KTs | K9s | K8s | K7s | K6s | K5s | K4s | K3s | K2s |
| AQo | KQo | QJs | QTs | Q9s | Q8s | Q7s | Q6s | Q5s | Q4s | Q3s | Q2s | |
| AJo | KJo | QJo | JJ | JTs | J9s | J8s | J7s | J6s | J5s | J4s | J3s | J2s |
| ATo | KTo | QTo | JTo | TT | T9s | T8s | T7s | T6s | T5s | T4s | T3s | T2s |
| A9o | K9o | Q9o | J9o | T9o | 99 | 98s | 97s | 96s | 95s | 94s | 93s | 92s |
| A8o | K8o | Q8o | J8o | T8o | 98o | 88 | 87s | 86s | 85s | 84s | 83s | 82s |
| A7o | K7o | Q7o | J7o | T7o | 97o | 87o | 77 | 76s | 75s | 74s | 73s | 72s |
| A6o | K6o | Q6o | J6o | T6o | 96o | 86o | 76o | 66 | 65s | 64s | 63s | 62s |
| A5o | K5o | Q5o | J5o | T5o | 95o | 85o | 75o | 65o | 55 | 54s | 53s | 52s |
| A4o | K4o | Q4o | J4o | T4o | 94o | 84o | 74o | 64o | 54o | 44 | 43s | 42s |
| A3o | K3o | Q3o | J3o | T3o | 93o | 83o | 73o | 63o | 53o | 43o | 33 | 32s |
| A2o | K2o | Q2o | J2o | T2o | 92o | 82o | 72o | 62o | 52o | 42o | 32o | 22 |
CallMixedFold
Expected value per hand (bb)
Highest EV: AA +3.74 KK +3.24 QQ +2.9 JJ +2.53 AKs +2.3 TT +2.24 AKo +2.17 AQs +2.01
Barely +EV (near-indifferent): Q7s +0.01 J9o +0.01 Q6s +0.02 96s +0.02 J7s +0.04 65s +0.05
Looks playable, quietly loses: K4s -0.01 T6s -0.01 Q9o -0.01 Q5s -0.02 K9o -0.02 75s -0.02 54s -0.03 K3s -0.04
At twenty-five blinds the small blind jams 36% and the big blind calls 17%. This is the deepest stack on the chart and the one where a jam-or-fold strategy is furthest from optimal — a raise-fold game beats it clearly here.
So why publish it? Because it is the boundary. It tells you the exact point where a hand stops being worth 25bb preflop, and it tells you what a correct shove looks like when an opponent hands you one. The hands sitting at +0.01bb in the EV table are the whole lesson: they are barely a shove, and calling them wide is a mistake.
The exploitability of this stack is among the highest on the chart, which is the honest way of saying the approximation is loosest here. Treat these numbers as a guide to the shape of the ranges, not as gospel on individual borderline hands.
Save or print this chart
FAQ
What is the correct heads-up shoving range at 25bb?
The small blind jams about 36% at 25bb; the full Nash range is on this page with the EV of every hand. Hands showing between +0.00 and +0.03bb are close to indifferent — shoving or folding them costs almost nothing in the long run.
Do these heads-up charts assume the big blind plays correctly?
Yes — both ranges are the equilibrium against each other (the big blind calls 17% here). If your opponent calls too wide, tighten your jams to value; if they fold too much, widen toward any two cards. The equilibrium is the baseline you deviate from, not a target to hit against a bad player.
Related charts
Heads-Up Push/Fold Chart 5bb (Nash)Heads-Up Push/Fold Chart 8bb (Nash)Heads-Up Push/Fold Chart 10bb (Nash)Heads-Up Push/Fold Chart 12bb (Nash)UTG Opening Range (6-Max)BB Defence vs Button Open (6-Max)
The trainer that draws these charts is a free download — core training is free, no signup, works offline.
Get it on Google PlayDownload on the App Store
Push/fold tables are a self-computed chip-EV Nash equilibrium (Monte-Carlo hand-class equity, 25,000 samples, seed 1234). Known limits, stated plainly: they ignore ICM, and the model does not apply card removal to the callers' range — so offsuit aces, which block a caller's AA/AK/AQ/AJ, are slightly undervalued. Exploitability for this stack: 0 bb/hand.
Updated 2026-09-12